SSVEP Speller
Contents
What is a Speller System
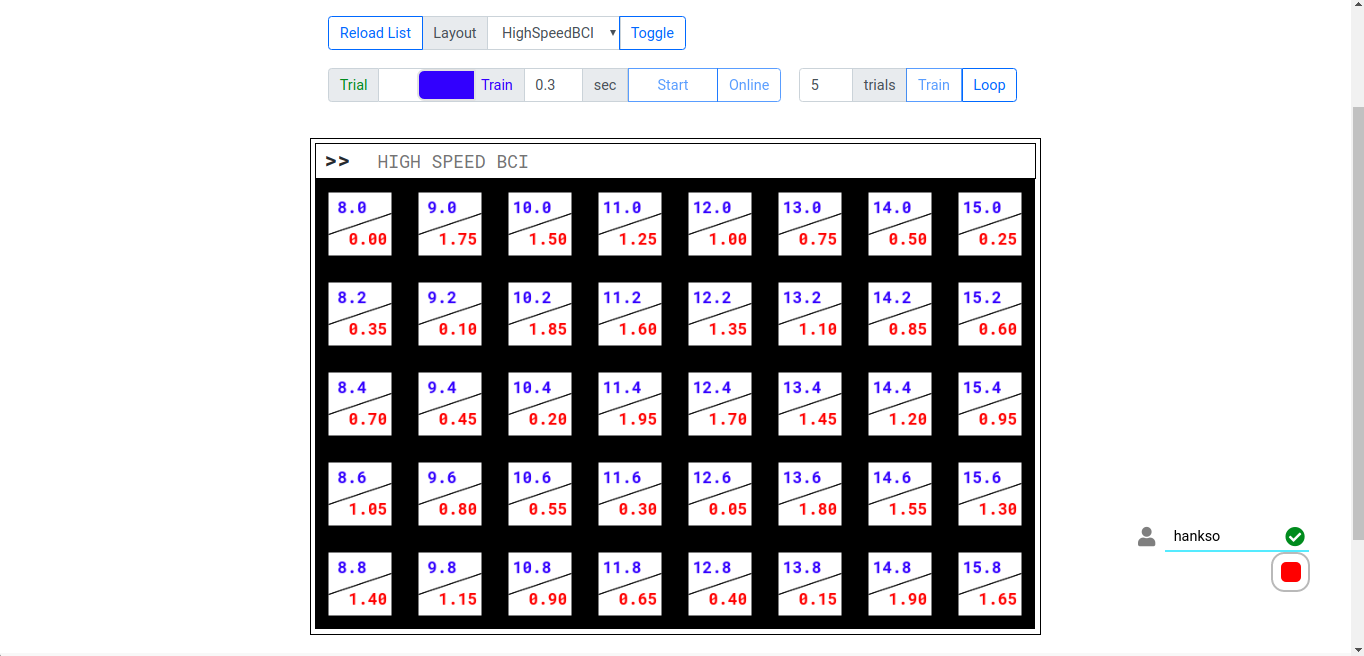
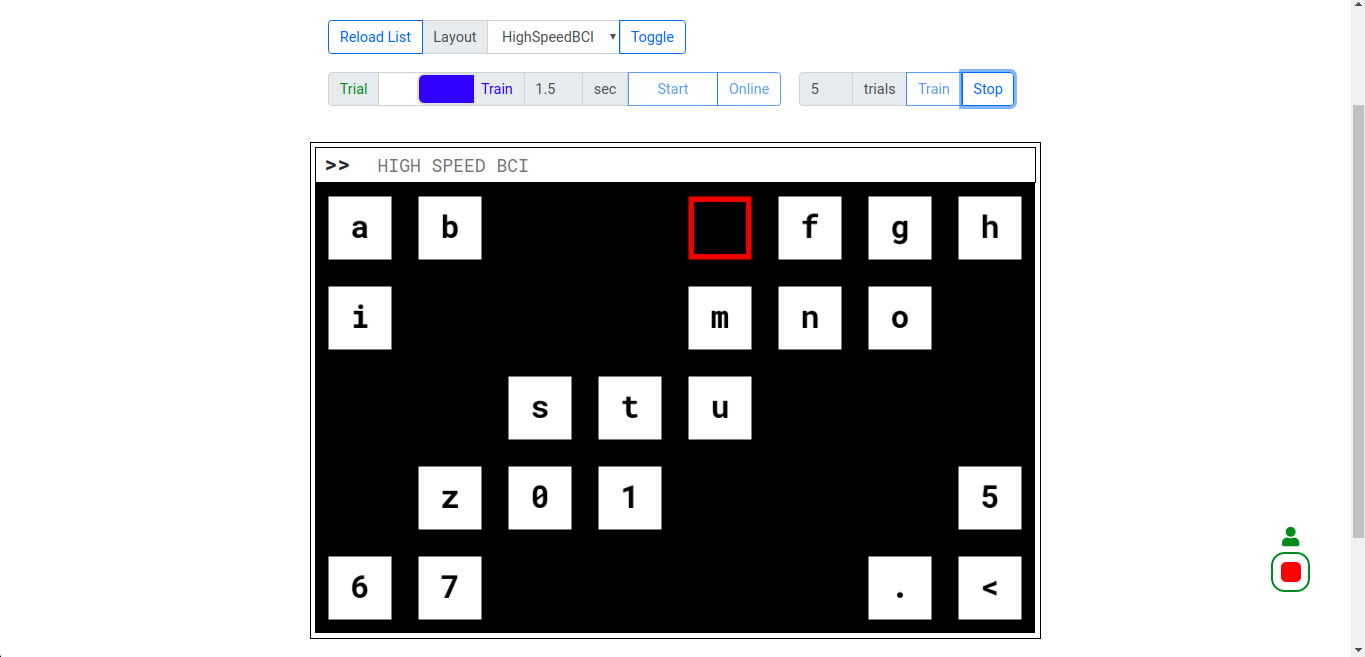
A speller system is a special system design for disabilities to spell words with brain, which is also known as Mind Typing. In EmBCI, the Speller app integrates a web user interface and some bio-signal analysis algorithms. It displays array of blocks on webpage. Each block is marked with an alphabet and will blink in a specific frequency. EEG signal of users will also be recorded simultaneously. By analyzing EEG data, we can find out which block user is gazing at, thus the alphabet of that block is typed.
Users can watch the UI through computer, tablet or even mobile phone.
EmBCI SSVEP Speller
Website User Interface based Steady State Visual Evoked Potential Speller is a demo implemented on embedded platform (ARM device + EmBCI Board).
WebUI details
Display stimulus using HTML + CSS + JS
The most important work of rendering stimulus on webpage is to ensure that the frequency of flickers are constant and equal to the setting value. Color changing of stimulus must be strictly evenly spaced. In this project JS is used to control the color change of blocks.
Function setTimeout and setInterval
Using function setTimeout(handler[, timeout]) and setInterval(handler[, timeout]) to render animation of flickers has two disadvantages:
It’s not easy to select a proper timeout. The most frequently used value is 17ms (1000ms / 60FPS), but the real display refresh rate depends on the screen and driver.
setTimeout and setInterval only stack functions to be executed in a queue of browser UI process, not actually call them. If UI process is busy, functions will not be called in time.
As a better choice in this project, window.requestAnimationFrame is used to render flickers.
Function requestAnimationFrame
The rAF is a relatively new API, recommended to be used for implementing interactive applications in the browser. This method ask the browser to call the callback function before the next repaint. As W3C recommended, rAF execution frequency match the real display refresh rate in most web browsers.
HTML Canvas
HTML <canvas> element is one of the most widdly used tools for rendering 2D graphics on the web. However, when websites and apps push the Canvas API to its limits (for example 60FPS), performance begins to suffer. Canvas supports many different backends including 2D, webgl, bitmaprender etc. In this project 2D backend with multi-offscreen canvas and WebGL backend are employed to make the best use of canvas for better render performance.
Canvas 2D backend
In morden browsers, whenever something happens that changes a webpage’s look or content, the browser will schedule a repaint operation soon after the changing to update page. Because repaints can be an expensive operation to CPU, it’s better and much faster to draw animation on an offscreen canvas and render the whole scene once to the onscreen canvas.
For example, when you need to inverse the color of block a, c and z:
for (var blk, i = 0; i < 3; i++) {
    blk = [blockA, blockC, blockZ][i];
    if (blk.on) ctx.fillStyle = 'black';
    else        ctx.fillStyle = 'white';
    blk.on = !blk.on;                         // inverse color
    ctx.fillRect(blk.x, blk.y, blk.w, blk.h); // draw on main canvas
}
It needs three repaints (3 * 1000/60 = 50ms) to render this color changes, one for each block. In other words, if only one canvas is used, color changes is done in memory, but not updated to screen yet. So offscreen canvas is widely used for draw multiple items & render once time. Offscreen canvas is actually a canvas element that is not included in HTML element tree:
// Create the offscreen canvas after whole HTML document is loaded.
var ctxOs = document.createElement('canvas').getContext('2d');
// Offscreen canvas will be rendered on main canvas later, so must match size
ctxOs.canvas.width = mainCanvas.width;
ctxOs.canvas.height = mainCanvas.height;
Although we use requestAnimationFrame instead of setTimeout (multiple drawings will be handled inside one repaint), using offscreen canvas is still preferred. So, to inverse color of blocks the code will be:
for (var blk, i = 0; i < blocks.length; i++) {
    blk = blocks[i];
    if (blk.on) ctxOs.fillStyle = 'black';
    else        ctxOs.fillStyle = 'white';
    blk.on = !blk.on;                           // inverse color
    ctxOs.fillRect(blk.x, blk.y, blk.w, blk.h); // draw on offscreen canvas
}
ctx.drawImage(ctxOs.canvas, 0, 0);              // render to onscreen canvas
Alpha channel(transparency) of keyboard canvas is disabled to optimize the performance. And alphabets are rendered on an individual canvas above keyboard layer because this layer doesn’t need to be redrawn once initialized.
Optimization
Using code below to calculate the real frames per second:
timeout = 300;  // 300ms
function loopTask(ts) {
    if (!starttime) starttime = ts;
    if ((ts - starttime) < timeout) {
        requestAnimationFrame(loopTask);
    } else taskDone = true;
    time1 = performance.now();
    blinkBlocks(layout)
    time2 = performance.now();
    fps = 1000 / (time2 - time1);
    console.log(
        'Frame start at', ts.toFixed(2),
        'latency', (time2 - ts).toFixed(2),
        'end at', time2.toFixed(2),
        'used time', time2 - time1,
        'FPS', fps.toFixed(2)
    );
}
Start session by loopTask(performance.now()). And the log information will be something like:
TODO: copy log information here
Session Workflow
client send session.init event or GET /sess/start
server start recording data and broadcast mark by pylsl outlet
server send recorder.start event
client enable flickers on receiving recorder.start
client disable flickers after task done
client send session.end event or GET /sess/stop
server start generate result on receiving session.end
server send session.result event indicating that the result is ready
client fetch result when session.result or by looply GET /sess/result
![digraph G {
label = "Session Workflow of EmBCI Speller";
newrank = true;
color = lightgrey;
// subgraph cluster_legend {
// label = "Legend";
// rankdir = "LR";
// node [style=invis];
// l0 -> l1 [label="HTTP GET", style=dotted, color=red];
// l2 -> l3 [label="EventIO"];
// l4 -> l5 [label="Processing", style=dashed, dir=none];
// }
subgraph cluster_client {
label = "Client side";
style = rounded;
node [style=filled, color=lightgrey];
edge [style=dashed, dir=none];
c0 [label="Start Request"];
c1 [label="Start\nVisual stimulus"];
c2 [label="Stop\nVisual stimulus"];
c3 [label="New: wait until"];
c4 [label="Legacy: looply GET"]
c1 -> c2 [label="Session time"];
c2 -> c3 [color=blue];
c2 -> c4 [color=red];
}
subgraph cluster_server {
label = "Server side";
style = rounded;
node [color=green];
edge [style=dashed, dir=none];
s0 [label="Establish LSL Mark Outlet"];
s1 [label="Start recording"];
s2 [label="Stop recording"];
s3 [label="Generate result"];
s4 [label="Result buffer"];
s0 -> s1 [label="Broadcast event"];
s2 -> s3 [label="Classification"];
s3 -> s4 [label="Append into"];
}
{rank=same; s0, c0}
{rank=same; s1, c1}
{rank=same; s2, c2}
{rank=same; s3, c3}
{rank=same; s4, c4}
edge [style=solid, color=black, fontcolor=black];
c0 -> s0 [label="session.init"];
s1 -> c1 [label="recorder.start"];
c2 -> s2 [label="session.end"];
s3 -> c3 [label="session.result"];
edge [style=dotted, color=red, fontcolor=red];
c0 -> s0 [label="/sess/start"];
c2 -> s2 [label="/sess/stop"];
{c3, c4} -> s4 [label="/sess/result"];
}](../_images/graphviz-59fad962f494c3982c3c9137dba023704366fd71.png)
API
EventIO
- WebSocket
- desc
EventIO connection point
- method
POST(websocket)
- path
/event/ws
- Update client
- desc
Go though connection stack and update current active client. Usually you don’t need to call this manually. It is executed automatically.
- method
GET
- path
/event/update
- List events
- desc
List all available events in JSON format.
- method
GET
- path
/event/list- example
[{'code': 200, 'name': 'recorder.start'},
 {'code': 201, 'name': 'recorder.close'},
 ...
]
- Send event
- desc
Send event from client to server by query string
- method
GET
- path
/event- param
str
- example
event?str=%7B%22code%22%3A0%2C%22name%22%3A%22hi%22%7D
- Trigger event
- desc
Ask server to broadcast an event
- method
POST
- path
/event- param
name | code
- example
var eventObject = {code: 0, name: 'hi'};
jQuery.ajax({
    url: '/event',
    method: 'POST',
    data: {name: eventObject.name} or {code: eventObject.code}
});
Session
- Start session
- desc
Legacy interface to schedule a new session
- event
Send event
sess.init- method
GET
- path
/sess/start- param
ID (optional) & timeout (optional, millisecond)
- return
“{‘recorder.start’: ID}”
- example
/sess/start?ID=deadbeef&timeout=300
- End session
- desc
Legacy interface to stop the session
- event
Send event
sess.end- method
GET
- path
/sess/stop- param
ID (necessary) & result (optional, bool)
- return
“{‘recorder.stop’: ID}”
- example
/sess/stop?ID=deadbeef&result=true
- Session result
- desc
Fetch the prediction result in JSON format
- method
GET- path
/sess/result- param
ID (optional when using EventIO)
- return
“{‘index’: [1, 2, 1, 0, 1, …]}”
Model
TODO: write doc for embci.apps.speller.model
Layout
- List keyboards
- desc
List all available keyboard layout filenames
- method
GET
- path
/layout/kbd- example
- Get a keyboard
- desc
Load a keyboard’s layout by name
- method
GET
- path
/layout/kbd/<name>- param
name (necessary, must be one in list)
- example
{"name": "/path/to/layout-filename.json",
 "blocks": [
    {
        "name": "alphabet",
        "freq": "frequency in Herz",
        "phase": "multiple of Pi in rad",
        "x": "coordinate X in pixel", "y": "coordinate Y in pixel",
        "w": "width in pixel", "h": "height in pixel",
    },
    {"name": "q", "x": 0, "y": 1.0, "freq": 8.0, "phase": 4.71238898},
]}